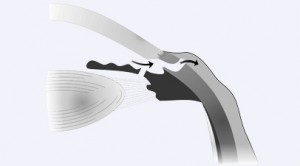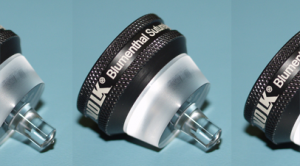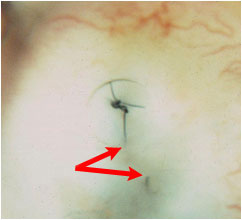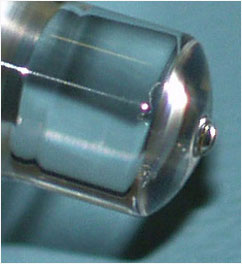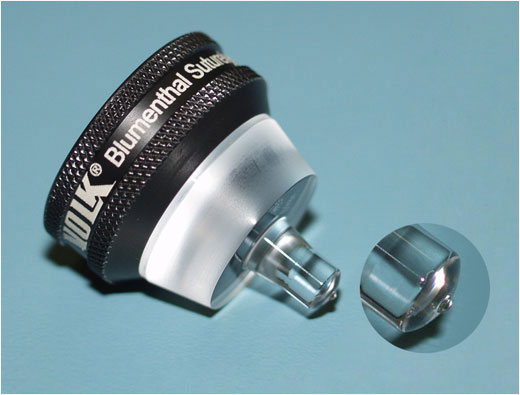
This novel lens design provides several distinct advantages:
- Suture magnification: owing to the convex back-surface (the surface facing the surgeon), the lens magnifies the suture appearance two to three fold.
- Compressive properties of the lens tip: the pointed tip provides a strong compressive force that increases visibility of the suture, and adds to stabilization of the treated area. This feature provides particular benefit in patients with thick Tenon’s layer or a subconjunctival hemorrhage. In fact, it is often possible to suturelyze a suture which is completely hidden from view when initially attempting to locate it (see technique description below).
- A familiar ring design: allows easy handling and maneuverability. The lens is held and managed much like other diagnostic lenses.
- Sturdy design: ensures years of dependable operation.
Some tips for suturelysis in difficult situations:
- Beyond the standard application of topical anesthetic drops, an applicator (or Weck cell) soaked in local anesthetic drops, and lightly applied over the treatment area, can reduce the discomfort rarely experienced by patients during suturelysis.
- A drop of Iopidine, Alphagan, or Phenylephrine can bleach overlying vessels and increase visibility of the treatment area. This, however is usually not necessary with this lens, since the compression provided by the tip will bleach all relevant vessels in the area of the suturelysis.
- Ask the patient to steady his/her gaze on an object (such as the lens box, a medication bottle or a piece of cotton) placed on the laser unit table in a downward gaze position. Alternatively, set the laser’s fixation light arm so that the patient maintains a steady downgaze fixation. Note that merely asking the patient to look down might not provide a sufficiently steady gaze throughout the procedure.
- Before placing the lens on the eye, identify the suture area and aim the lens tip in that direction.
- The suture you wish to bisect should be centered on the protruding lens tip. This is easily accomplished while looking through the lens.
- In cases where the suture cannot be visualized well, apply the lens tip firmly against the presumed area (where you believe the suture might be) for a considerable length of time, occasionally up to 60 seconds. Such compression will usually reveal sutures that are blurred by a thick overlying Tenon-conjunctiva layer. Occasionally, this steady pressure, held for up to one-minute, will reveal deep lying hidden sutures. Since it is often unclear where exactly the suture is, you might need to search for it (“blindly”) at several locations until suddenly the suture will present itself (often only after pressing down for some time at the correct location, i.e. precisely over the suture).
- ***INITIAL LASER SETTINGS***: a good starting point would be: an Argon green laser; 50 micron spot size; 0.1 seconds duration; 100mW energy setting.
- ***IMPORTANT***: POWER CONSIDERATIONS. It is recommended that the initial power set on the laser should be 100mW, and NOT any higher. Well visualized sutures should easily be suturelyzed using this energy level (or slightly higher). If the suture is covered by somewhat thicker conjunctiva-Tenon, and is, hence, not well visualized, the energy level should be very gradually increased until an effective suturelysis occurs. In eyes where a very thin (and thus transparent) conjunctiva is present, high energy settings might damage the overlying conjunctiva, resulting in a tiny 50 micron conjunctival button-hole which is usually self-sealing in up to a day or two, and if the energy is even higher, in addition, a small whitish permanent mark on the lens may occur. Make sure you start with a low energy setting and increase it gradually. In cases of very thick Tenon and barely visible sutures, power settings of 500-1000mW may be reached, but only via a very gradual power increase. Note that when the conjunctiva-Tenon is very thick, there is practically no risk of button-holing the conjunctiva even at higher energy levels. With experience, you will be better able to predict the appropriate energy setting for cases presenting different suture visibility, but always aim at erring on the side of a lower, rather than a higher energy setting. With certain, extra powerful, lasers, you might even want to consider starting lower than 100mW. This might be the case when you repeatedly note that sutures are very easily cut with the initial 100mW power setting.
- In the rare event when a hemorrhage is obscuring the view of the suture, note that the laser shot might, unfortunately, burn (“drill”) a hole through the conjunctiva (since the laser energy will be fully absorbed by the blood) or else, create an undesired coagulation whitish spot within the conjunctiva. In addition, the suture might not be amenable to suturelysis as the view of the underlying suture is fully obstructed by the blood. In such case one can try to identify a portion of the suture which is not covered with blood (make extra certain that remnants of blood are not overlying the area where suturelysis will be attempted), or else, simply wait a few days until the blood has been fully absorbed. Note that attempting a laser shot through blood is risky and can damage the tissue containing the blood (focally coagulating the conjunctiva or Tenon’s layers, as well as the lens’ surface).
- Note that older sutures are often partially bleached (less black in appearance), and hence more difficult to suturelyze. Such sutures might also not be as tight, and hence the cut edges might not retract elegantly, as usually occurs in the case of relatively new sutures. For both these reasons, it is much more difficult to cut sutures that are more than a few months old. Also, suturelysis performed past the 2-4 month window of opportunity, since surgery, might not be as efficient in producing a meaningful pressure drop.
- A 50-micron spot is the standard setting for suturelysis. In difficult cases (such as unsteady patient gaze), a 100-micron spot can be used. Power should be increased accordingly.
- After suturelysis is done, the special design of the lens’ tip can be further utilized to compress around (just posterior to) the area of the flap, in order to encourage filtration through the suturelyzed portions of the flap. If applied correctly, this pressure will “fish-mouth” (raise) the flap from its underlying bed. As fluid filtrates out of the eye, the conjunctiva will be seen inflating around the lens.
- ***IMPORTANT***: finally, some advanced math on spot-size energy density: It might be surprising for you to learn that a 100mW using a 50 micron spot unexpectedly translated into an energy density of 10W (10,000mW!) with a 500 micron spot (since the power density is proportional to the area ratio (or square of the length ratio). When thinking about energies from a density point of view, rather than from the point of view of the total laser spot energy, it becomes clear how “energetic” a 50 micron spot size is, even with a “low” 100mW setting. I believe that perhaps this is the reason why suturelysis is performed with such a small spot size (to maximize energy density levels), since from all other respects (such as aiming and hitting the suture) using such a small spot size is clearly a disadvantage. Finalizing this mathematical discussion, let’s now do the opposite calculation. You would certainly agree that a 500 micron 1000mW spot is quite energetic (we rarely reach these energy levels during PRP). Surprisingly, note that an equivalent energy density level with a 50 micron spot size would translate into a mere 10mW energy level. Incorporating this concept should leave you with an uneasy feeling even about the 100mW energy level when coupled to a 50 microns spot, and it becomes clear why excessively high energy levels might “drill” a hole in the conjunctiva and/or damage the lens surface. Since suturelysis is such a quick procedure (sitting the patient may take longer than performing the actual procedure), it is advisable to slowly titrate your energy levels. Continue doing so until you feel comfortable in reliably predicting the energy setting appropriate for different levels of suture visibility (i.e. different thicknesses of the overlying conjunctiva-Tenon). Even then, always start a little low and gradually increase the power setting.
In conclusion
The new Volk Blumenthal Suturelysis lens provides unprecedented visibility of trabeculectomy flap sutures, enabling cutting sutures which, with other suturelysis lens designs, were relatively inaccessible. This lens provides localized compressive forces and magnifies the appearance of the suture 2-3 times, resulting in enhanced visibility in difficult situations, as well as smooth & quick suturelysis in routine cases.
We recommend that you gain comfort with this lens in situations with relatively visible sutures and only then advance to more difficult cases. The most difficult eyes are those where the suture cannot be visualized at all, but gradually presents itself after a “blind” search with subsequent steady compression for 20-30 seconds, and rarely up to 60 seconds. Even in such difficult scenarios, however, the suture might be amenable to suturelysis with the aid of this novel lens design.
Finally, as with any other surgical skill, expect to go through a short learning period before achieving the maximal results possible with this lens.
[button link=”https://www.glaucoma.org.il/videos/volk-suturylsis-lens-demonstration-cd-tutorial” type=big]Press here to watch a Video Tutorial[/button]

